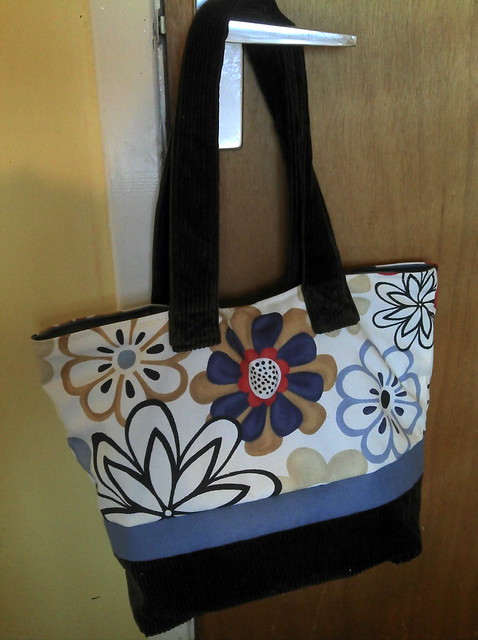
I'm forever losing things in the bottom of my bag, it's so annoying! So when I saw this tutorial by Liberty at Crafts reDesigned to make a bag with lots of pockets, I just had to give it a go.
I'm very pleased with the result! The handles were a bit tricky to sew on, but my trusty 1940s singer sewing machine rose to the challenge. I used brown corduroy for the base and the handles, blue denim (the reverse side) for the middle stripe and the lining, and two fabric samples for the main exterior and the pockets. If you can get hold of fabric sample books (my local soft furnishing shop gives them away for a donation) they are a great source of cheap, excellent quality fabric that will otherwise go to waste. Upholstery fabric tends to come in pretty large pieces, about 20" square, which is perfect for making bags like this!
Here's a picture of the inside:
All my bits and pieces (purse, phone, ipod, pens, keys, sunglasses) are all tucked away in the pockets, all easily accessible and (hopefully!) easy to find!
I followed the tute pretty much to the letter, except that I added a magnetic snap closure just before I sewed the topstitch round the top of the bag.
If you fancy having a go at making one yourself, do have a look at the tutorial , it's really well-written with lots of clear pictures, though I think it helped that I had made a few bags before.
I'm just thrilled with the result! I'm sure I will make another version soon.
Showing posts with label tutorial. Show all posts
Showing posts with label tutorial. Show all posts
Tuesday, 9 July 2013
Monday, 24 June 2013
Altoid Tin Earring Keeper!
SUCH a long time since I last posted! I've been busy doing other things for a long while - four children and a full-time job take up a lot of hours - but I just had to share this as I am so excited by what I created!
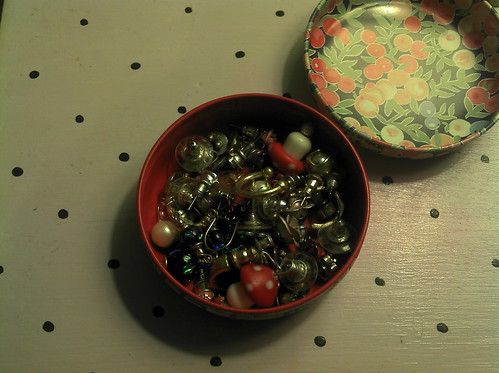
Like many people I'm sure, I love my earrings. I will often match them to my outfit (as I always say, you can take the girl out of the 80s, but not the 80s out of the girl!). I have a sweet little tin to keep them in, but I suspect you will immediately see the problem:
Yup - it can take several minutes to find a matching pair! So, I spent many an hour trawling the internet looking for a solution, and was surprised to find nothing fitted the bill. Lots of ideas on how to hang up your danglies, but nothing for studs, which comprises the majority of my collection.
Then I had an idea ...
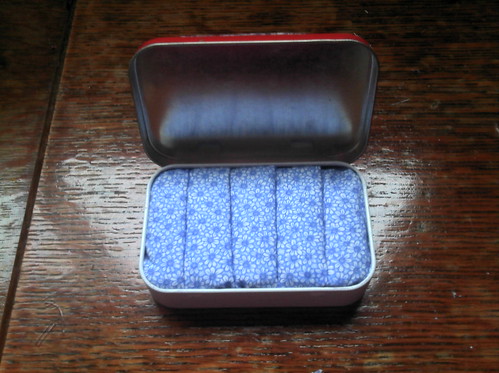
... can you see where I'm going with this? Here's a quick preview:
Ta daa!
OK, so here's what to do:
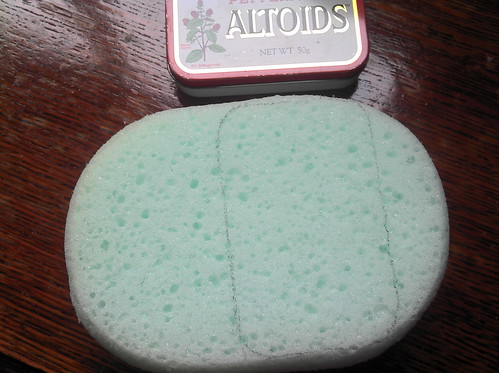
Firstly, take your altoids tin and draw round it onto the sponge:
Next, cut round your sponge. You can use a pair of fabric scissors or a scalpel (stanley knife), whatever works best for you. You may also need to cut your sponge in half if it's a big thick one. It should fit snugly in the tin, but not need "squashing" to fit it in. It should also be a little lower than the lip of the tin (note, I didn't do this and my tin won't shut with my earrings in! So learn from my mistake!)
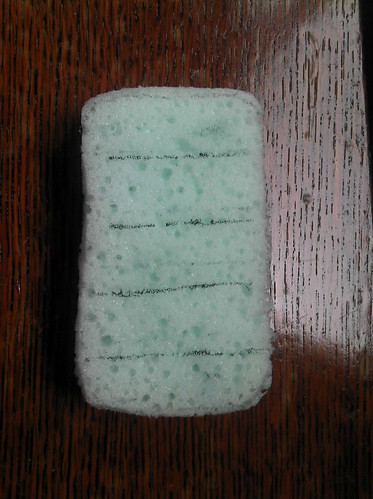
Now take your sponge out of the tin and mark out four equally spaced lines. As you can see from the rather grubby state of my sponge I had a couple of goes at this until I was happy! My sponge is about 10cm across, and my lines are at 2, 4, 6 and 8cm.
Then, using your scissors or scalpel, cut along the lines to about HALFWAY through the sponge. Do not cut all the way through!
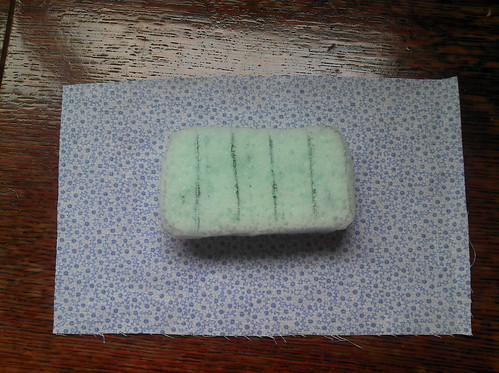
Next, choose your fabric. I chose one with a small subtle pattern, as I wanted my earrings to be prominent and not lost among a "busy" background. A fine cotton fabric works best; I would avoid anything very stretchy or slippery.
I cut my fabric to a generous size, about 25cm by 15cm. You need plenty of extra fabric to fit down the slits you created in the sponge.
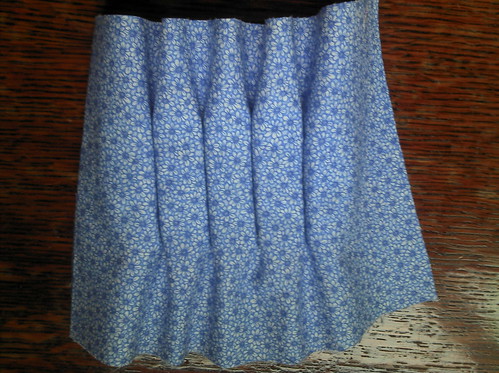
The next bit is a little fiddly, but not as difficult as you might expect as the sponge helps to "grip" the fabric. Starting at one end, leaving enough fabric to wrap around the end of the sponge, gently push the fabric down the first slit, then continue along the sponge until all the slits are filled. If you aren't happy with it, simply pull it out and start again! You should end up with something looking a bit like this:
As you can see, I've left spare fabric at both ends to tuck round the sides.
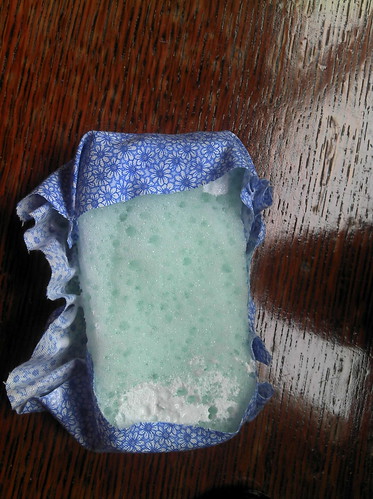
Next, turn the whole thing over and put a generous blob of glue on each end of the sponge. Press the fabric down firmly until it sticks. (As you can see from the photo, I was rather over-generous with the glue at one side!)
Now, trim the sides down a little (if needed), leaving enough fabric to wrap around the sides and onto the base of the sponge. Add some more glue and firmly stick down the fabric, holding it in place until the glue starts to do its job. On this picture I had got one side to stick, but not the other!
It doesn't need to be really neat, just enough to hold the fabric in place. Now turn your creation over and pop it into your tin.
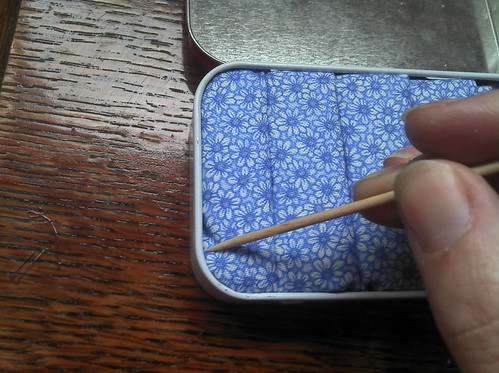
Looking good! You can use a cocktail stick or toothpick to neaten up the sides and get your fabric to sit just right.
Now you just need to finish off the top. If you like, you could just leave it au naturel, or you could paint it, or stick a picture on it - the choices are endless! There are lots of great tutorials out there which can give you ideas. I decided just to add the same fabric to the lid as the inside, since my tin is just going to sit on my bedside table and not get bashed about in a bag or suitcase. So I laid my tin on my fabric and drew round it:
Then I smeared glue evenly over the lid and stuck it on:
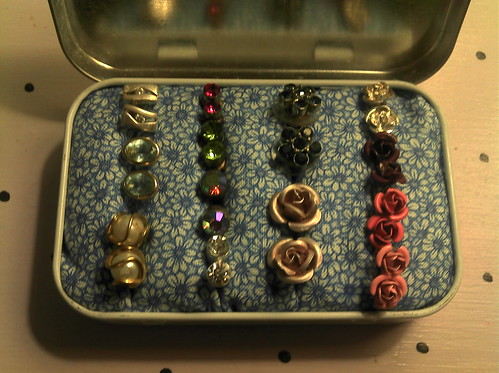
And there we have it! The final thing to do, of course, was to add my earrings.
As you can see, I left the few dangly pairs I have in my little round tin. But now I can find all my studs at a glance. No more rooting around frantically first thing in the morning!
Friday, 6 April 2012
Branching out
I'm always keen to try my hand at new things. I am most confident when it comes to working with textiles, but somtimes I get an overwhelming urge to have a go at something different. The thing I find surprising is that I often find I don't enjoy something I thought I'd love, or I develop a new passion in an area that previously held little appeal. Has that ever happened to you?
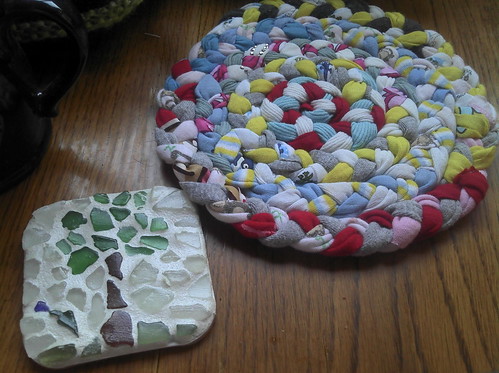
Anyway, I thought I'd share a few projects I made in the last couple of years that I've not put on this blog before. I have a passion for recycling, and there's nothing I like more than to make something great out of things that is usually viewed as rubbish. I'm very lucky to live by the sea, and often enjoy beachcombing on a good day. As a result I have lots of boxes full of little pieces of sea-washed glass and pottery. Sea glass is beautiful - the combination of sand and rolling waves softens the edges of the broken glass and mottles the surface. Most of the pieces I find are white or various shades of green, but occasionally I find the odd little bit of blue and brown (and once a beautiful pale pink piece!). I have made a few coasters using the sea glass which I use in my studio when I'm in need of a cuppa:
Also pictured is a trivet I made from recycled t-shirt material (see my tutorial on how to make a rug - it's just a smaller version of that!). The coasters are easy to do - I bought some cheap coasters, painted them white with some acrylic paint, added the glass with a little wood glue, then grouted the whole thing once the glue was dry. A couple of coats of varnish over the top ensured it was waterproof. Just make sure the pieces of glass you use are as flat as possible - sea glass usually comes from broken bottles so are often curved in shape - the smaller the pieces you use, the flatter they tend to be.
However I wanted to make something to showcase the bigger (and less flat!) pieces of glass I had collected, so I made this mirror for our bathroom:
I just love this mirror - the big piece of glass in the bottom centre fish, the different colours, the swirls - it was worthwhile. But I surprised myself by not enjoying the process of making the mosaic as much as I thought I would - I got stressed about how and where to put all the individual pieces, and worried about whether I had made the right decisions! However it hasn't put me off making them as I just love the end result. I went on to cover a large planter in bits of pottery I found on the beach too (here it is in a local gallery):
When making this one I relaxed a lot more and just shoved things on fairly randomly. You can tell! But I like the end result and so far it has survived the winter in my garden quite nicely. I attached the pieces with cement this time and used a grout suitable for outdoors.
I hope you like my forays into things other than textiles and that it encourages you to have a go at something you may not normally consider trying.
Tuesday, 3 April 2012
Baby sock rabbit tutorial ... and giveaway!
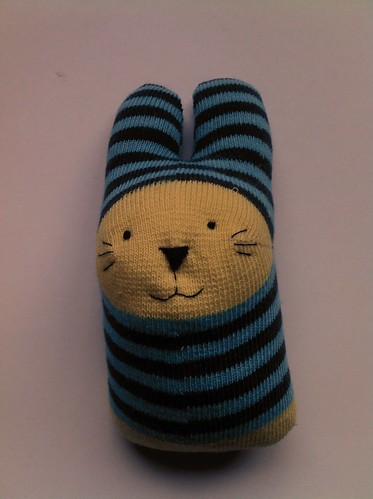
Easter is almost upon us, and if like me you would always rather give a handmade gift than yet more chocolate, then I have a little tutorial for you to run up a very sweet present for a child near you! All you need is a baby sock, sewing thread and stuffing, and a spare half hour. In no time at all you will have a unique gift to bring a smile to someone's face!
So - first find yourself a baby sock. Let's face it, if you have small children, you probably have a bunch of these, all missing their mate. I have a theory that all lost socks find their way to heaven, and on your arrival there you get presented with a box full of them. But that's just my warped imagination.
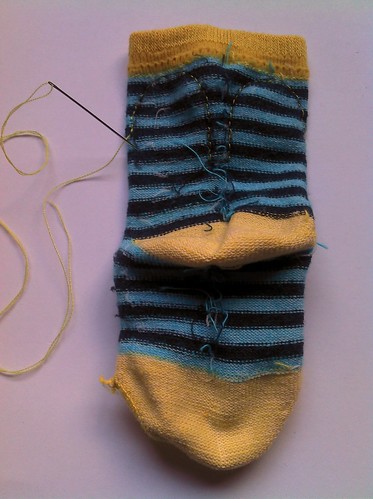
Turn your sock inside out. Using a biro or a felt tip, draw an outline of the ears at the top of the sock (the cuff end). Your ears should cover between a half and two-thirds of the top part of the sock. If you are using a white sock you might want to use a paler colour just in case it shows through, but it shouldn't matter too much. Leave a wee gap between the ears so that you can cut down it later.
Next, take some sewing thread and sew along the lines you just drew. I've used yellow thread so that you can see it easier, but it's better if you match it to the colour of your sock. Use a backstitch and make your stitches small and neat. If you prefer you could use a sewing machine to do this bit; handy if you decide to make a few of them at the same time.
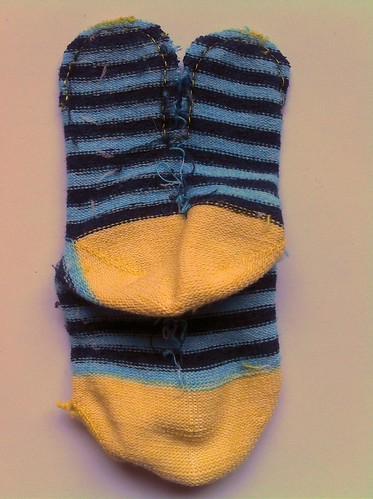
Cut round your ears, leaving a small border round the edges. Make sure you cut almost up to, but not in to, the stitching across the bottom of the ears.
Next, cut a hole in the toe of the sock. It should be big enough for you to put the stuffing through.
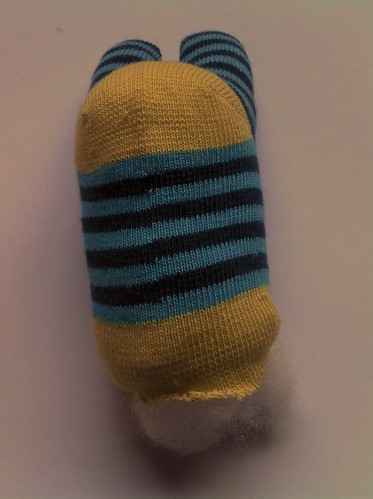
Now turn your bunny the right way out and stuff it! Make sure the stuffing is evenly distributed across the ears, and resist the temptation to overstuff it. The softer and squishier they are, the more huggable they are. So my kids tell me anyway.
Sew up the bottom of your rabbit using matching thread. As you can see from my photo, I gently turned the raw edges in as I sewed for a neater finish.
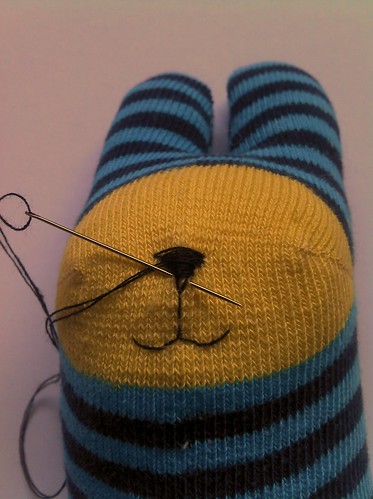
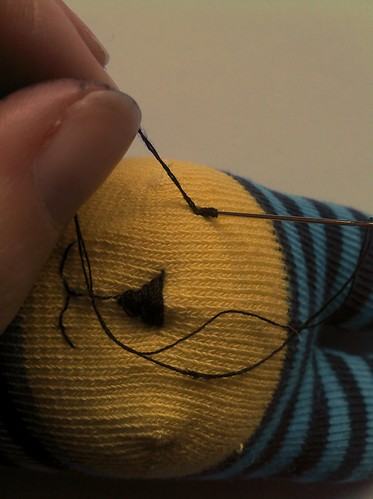
Now it's time to work on the face! I just wing this bit freehand, but if you are a bit nervous about that, you could draw on the features with washable marker pen first. You could use embroidery thread or ordinary sewing thread for this bit (I used sewing thread because it's a bit finer and I like delicate features, but it can be a bit fiddly when it comes to filling in the nose). Start by sewing an upside down triangle for the nose, making the top of the triangle level with the seams on the heel of the sock. Then sew the mouth with the stitches curving upwards at the ends (otherwise you will have a sad bunny).
Next fill in the nose. As you can see from my photo, I used my thread doubled at this point to make it a bit less fiddly, but you could use embroidery thread instead if you prefer.
Now add some french knots for eyes. If you aren't giving it to a small child, you could use seed beads or little buttons for the eyes instead (see the end of the post for some rabbits with seed bead eyes).
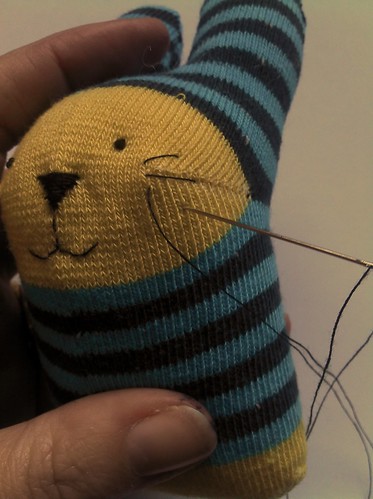
Finally give your rabbit some whiskers. Bring your thread out at the start of the heel seam, and sew a long stitch along it. Add two more stitches either side of this one at an angle. Repeat for the other side.
And there you have it! Your own little baby sock rabbit.
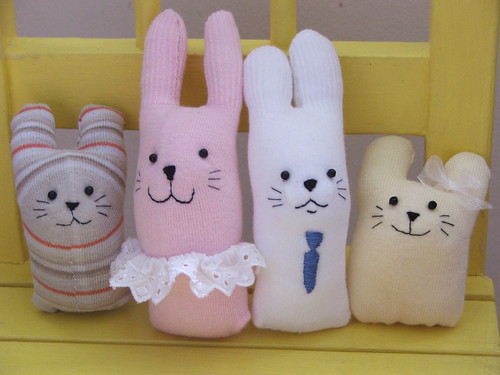
You could make them in lots of different colours:
You could even make a family of them! (I made these last year - check out the seed bead eyes). For the mummy rabbit I used one of those socks with a frill round the top.
So - go and have fun making your own wee rabbits! As always, feel free to make as many little rabbits as you like for your own use or for gifts, but please do not make them to sell. If you do make them and post your results, please link back to my tutorial - and come and let me know so I can see what you made! I've also set up a flickr group for you to add your bunny pictures to, so we can share them all!
And finally - I did say there was a giveaway, didn't I! If you would like the little rabbit I made for the tutorial, please leave a comment on my post; if you link to my tute and giveaway on your own blog then come and post that too, it'll give you an extra entry into the giveaway! I will choose a winner at random next Monday and post the results on here.
Thank you for reading - I can't wait to see the rabbits you make!
Saturday, 21 January 2012
Journalling - a new adventure
It's been a while since I blogged, but I have still been creative even though I've been quiet!
I'm generally more of a fabric fan, but just recently I had a yearning to doodle. I've fallen in love with pinterest recently and have been collecting pictures of art journals. I decided to start keeping one myself. I searched high and low in the local shops for a suitable book to use, but couldn't find anything! After waiting impatiently for a couple of weeks to see if any came in, I had the brainwave of making my own journal. I've always thought of this as a really hard, technical thing to do, but in fact it's really not that difficult.
So here is a sort-of tutorial (it's only a "sort-of" because I didn't take pictures of every stage, it just occurred to me afterwards that it might be good to share the process!).
OK so bear with me as I don't have pics of this bit. First thing I did was get hold of five A2 sized sheets of watercolour paper. Now I know not everyone has these lying around. I happen to have a very generous art-teacher friend who was clearing out her cupboards. Using a long ruler as a guide, I tore each sheet in half and half again, so I had four A4 sized sheets from each large one. I could have cut them, naturally, but I quite like the look of torn edges, plus I wanted a bit of a rough-and-ready look to my journal.
Once each sheet was torn into four, I folded the four sheets in half, so I ended up with five stacks of folded paper. Then, using a bradle (is that how you spell it? little metal spike with nice handle!) I poked three holes through the centre of each set of pages at regular intervals (having measured them first).
Picture coming soon, I promise! I then stitched the pages together. I kind of used this very helpful tutorial to work out how to stitch the pages together, but having only made three holes rather than four I realised I had made life a little difficult for myself! Still, I managed to attach all the pages to each other. You would think it is very fiddly, but honestly it's not. This pic show the sewn pages of my journal (I used waxed linen thread to sew it together, and it's black because that's all I had!)
See? It's not mega pretty along the edge but it won't show in the finished article, and it's fairly unobtrusive inside.
OK, next I made my cover. I used a lovely green moleskin-effect fabric that I had bought years ago, waiting for the right project to "speak" to me, and it shouted that it wanted to be a journal cover! I don't know how well it will stand up to wear and tear, and I suspect it will look fairly grubby by the time the journal is full, but I think that will all add to the authenticity.
So I started by cutting two pieces of stiff card the same size as my folded pages (so about A5). I measured the height of my sewn pages and made that the distance between my pieces of card. I glued the card down with some wood glue (just what I had to hand; copydex or fabric glue would do just as well). I then weighted down the card until it had dried as the glue had made it warp a little.
I then cut out my fabric, leaving about 2cm extra round the sides, and about 10cm at the right hand side. This was to make a flap to go round the journal, to keep it protected when not in use. I also cut two parallel slots in the "spine" of the fabric (you can see those in the photo above) at two points, for me to thread the ribbon through later. I then glued the extra fabric down onto the stiff card, trimming it at the corners and the spine so it folded down nicely.
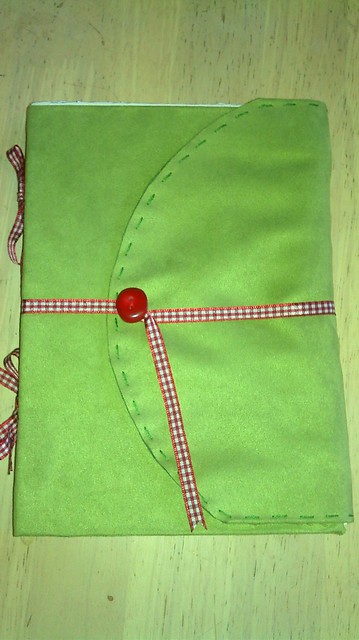
Having made a flap for the front, I decided it would work better if the flap was rounded. So I used a dinner plate to draw a curve onto the fabric, and onto a second piece of fabric which I then attached with a simple running stitch to the over. Here it is:
The added bonus is that the flap makes a little pocket which is perfect for keeping wee pictures and inspirations in for later!
Now I added the ribbons which attach the book pages to the cover. I've not seen this done before so I made this bit up as I went along. Here's a close-up of the ribbon attached:
Basically I threaded the ribbon onto a tapestry needle and, starting from the outside, threaded it through the uppermost slot, then down through the threads on the pages, then out through the lower slot. I tied the ribbon in a bow and cut it to the correct length, then repeated for the other end. I won't lie: this bit IS fiddly. If you have a curved needle then it will make it much easier. But don't let that put you off; it's only a very small part of the process. Here's how it looked after both ribbons are attached:
I rather like it!
Next step was to finish off the cover. I took another length of the red gingham ribbon and sewed it, together with a lovely cherry-coloured button, onto the centre of the curved flap. The ribbon wraps around the book, then twists round the button to hold it firmly in place. In all I bought two metres of ribbon and that was plenty for the whole project. I am SO glad I went for red, it really pops against the green fabric!
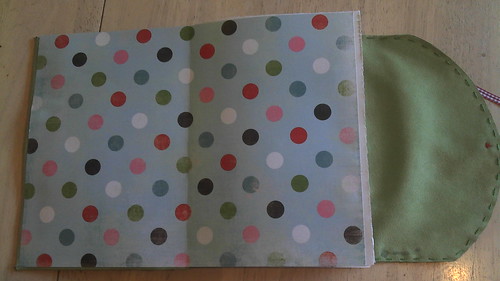
Final step was to add some endpapers. These cover up the bits where the fabric is glued inside and hide the spine. They also help to strengthen the bond between the pages and the cover. I used a couple of sheets of scrapbooking paper, cut them to A4 size then folded them in half, then glued them in place, making sure the pages were squared up to the stiff card of the cover:
I then placed the whole thing under a pile of books until the glue had dried.
So there you go - I hope you like my journal! It was my first attempt at making a journal and I can see all the bits that didn't quite work the way they should have ... but I'm happy with the basic principles (which is why I'm brave enough to share them!)
Lastly of course I created my first journal page ... this is it almost completed. Since I took this picture I've added some more colour to the "leaves" and the trunk.
Thank you for reading; I hope this inspires you to have a go at making your own journal!
Wednesday, 2 September 2009
As promised, the recycled rug tutorial!
Here's a run-down of how to make your own recycled rug! First of all, collect together all your old cast-offs. I used this one as a sample as it had a glaring stain in the middle; however, when I took the photo the stain miraculously disappeared!! Just so you don't think I'm mad I've added an arrow to show where the stain is. (Actually that in itself is probably a bit mad. Ah well.)
 1. Ok so the first thing to do is to remove the seams. Lay the fabric out flat in a single layer; don't worry about squaring up the edges.
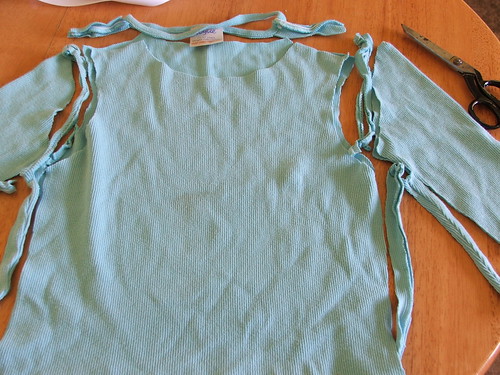 2. Using a guide, cut the material into strips. I made my guide from another t-shirt and wrote on it so I wouldn't lose it! My guide is 2 inches (5cm) wide, and being made of material it clings to the fabric nicely meaning I don't need to pin it on.
 3. Voila - lots of strips of fabric! Carry on with the rest of your t-shirts until you have a nice satisfying pile to run your fingers through. I started off with a carrier bag full and though I cut them all up I still have quite a few left; however I got a good mix of colours that way.
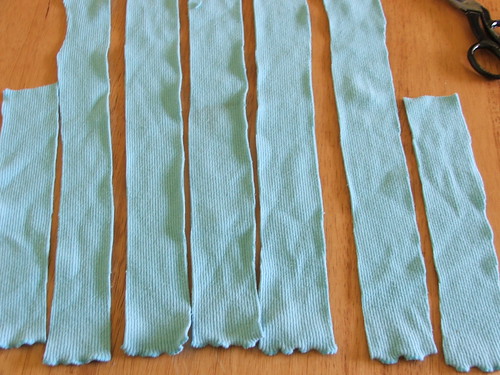 4. For your starting strips, cut a triangular shape out of each piece. Make sure each strip is a different length (I will explain why in a moment).
 5. Put a stitch through the end to hold them together.
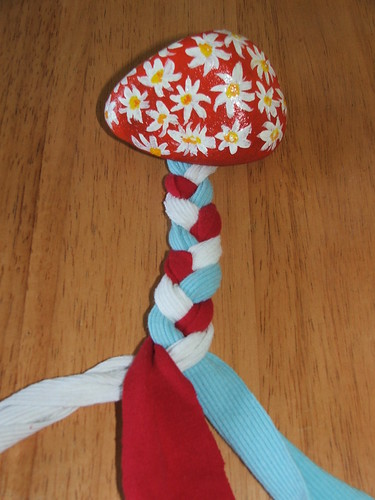
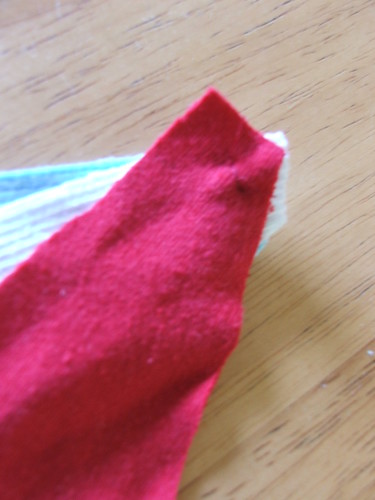 6. Using a weight to hold the ends down, begin to plait your strips. You might find it easier to get a willing slave to hold it for you. However I had no slaves when I took this photo so I nicked my daughter's paperweight. Make sure you plait your strips quite tightly together, but not so tightly that they start to buckle.
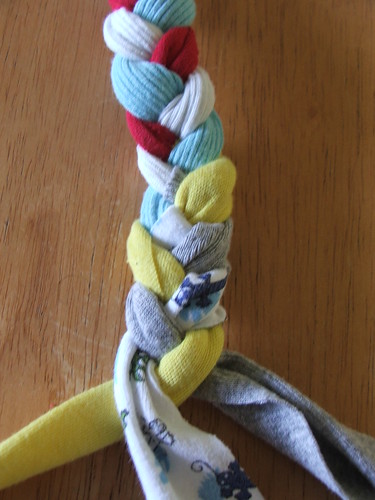
 7. When you have plaited to the end of your first strip, pick up the next strip and plait it in. Wrap the new strip round the end of the old one, with about an inch overlap (a little more if you are nervous). This is where having different length strips comes in; that way, you don't have lots of joins in the same place!
 8. Continue adding in new strips as you run out, until you get bored/have none left/want to start sewing it together. You can add more strips later if you like, or you can make one long plait then do all the sewing in one go.
 9. To begin the sewing, attach the thread to the back of the plait then, with the front uppermost, coil the end around itself with the ends tucked underneath.
 10. Flip the coil over and secure it with some small stitches.
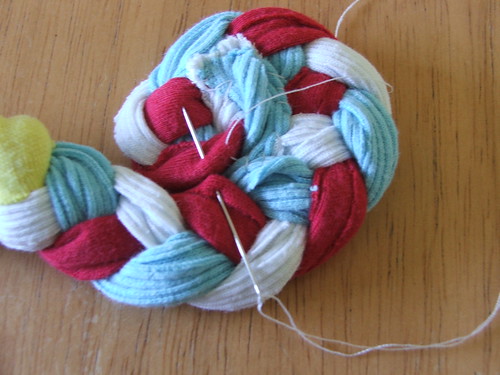 11. Continue to coil the plait around itself and sew together on the back. At this point it is easiest to continue with the rug back uppermost. It's vital to keep the rug flat whilst working so that it will lie flat when finished (if you make it on your knee then it will be full of lumps and bumps!), so it's best to do the sewing up on a table.
 12. Here's a close-up of the back of another piece so you can see the stitching. This is going to be a plaited bowl, so rather than working on a table, I'm coiling this one round a mixing bowl to make the shape.
 13. Here's the right side of the bowl (I'm experimenting with mixing similar shades here!
 14. And there you have it. When you are satisfied that your rug is the right size for you, then add a backing fabric to cover up the stitching (can't show you a photo of that bit because I haven't done it yet!). Use a good quality hessian for the backing and it should help your rug last well.
 15. And finally ... admire your handiwork!!
 1. Ok so the first thing to do is to remove the seams. Lay the fabric out flat in a single layer; don't worry about squaring up the edges.
 2. Using a guide, cut the material into strips. I made my guide from another t-shirt and wrote on it so I wouldn't lose it! My guide is 2 inches (5cm) wide, and being made of material it clings to the fabric nicely meaning I don't need to pin it on.
 3. Voila - lots of strips of fabric! Carry on with the rest of your t-shirts until you have a nice satisfying pile to run your fingers through. I started off with a carrier bag full and though I cut them all up I still have quite a few left; however I got a good mix of colours that way.
 4. For your starting strips, cut a triangular shape out of each piece. Make sure each strip is a different length (I will explain why in a moment).
 5. Put a stitch through the end to hold them together.
 6. Using a weight to hold the ends down, begin to plait your strips. You might find it easier to get a willing slave to hold it for you. However I had no slaves when I took this photo so I nicked my daughter's paperweight. Make sure you plait your strips quite tightly together, but not so tightly that they start to buckle.
 7. When you have plaited to the end of your first strip, pick up the next strip and plait it in. Wrap the new strip round the end of the old one, with about an inch overlap (a little more if you are nervous). This is where having different length strips comes in; that way, you don't have lots of joins in the same place!
 8. Continue adding in new strips as you run out, until you get bored/have none left/want to start sewing it together. You can add more strips later if you like, or you can make one long plait then do all the sewing in one go.
 9. To begin the sewing, attach the thread to the back of the plait then, with the front uppermost, coil the end around itself with the ends tucked underneath.
 10. Flip the coil over and secure it with some small stitches.
 11. Continue to coil the plait around itself and sew together on the back. At this point it is easiest to continue with the rug back uppermost. It's vital to keep the rug flat whilst working so that it will lie flat when finished (if you make it on your knee then it will be full of lumps and bumps!), so it's best to do the sewing up on a table.
 12. Here's a close-up of the back of another piece so you can see the stitching. This is going to be a plaited bowl, so rather than working on a table, I'm coiling this one round a mixing bowl to make the shape.
 13. Here's the right side of the bowl (I'm experimenting with mixing similar shades here!
 14. And there you have it. When you are satisfied that your rug is the right size for you, then add a backing fabric to cover up the stitching (can't show you a photo of that bit because I haven't done it yet!). Use a good quality hessian for the backing and it should help your rug last well.
 15. And finally ... admire your handiwork!!
Subscribe to:
Posts (Atom)
