I discovered Pinterest a few months ago and it has really changed the way I research what I am going to make next. I was doing my own version of collecting on-line inspiration, but boy it was hard work, cumbersome, and often involved losing stuff! If I had a good colour printer I would probably have contemplated printing some things out, just so I could keep them!
For many years I have kept what I call "happy books" - scrapbooks filled with pictures I love or find inspiring - and I still do keep these to hand for pictures I cut from magazines or birthday cards I receive. There's still a place for the book and the paper record after all. But I find Pinterest incredibly absorbing and a great way to find inspiration whilst I have a quick cuppa tea.
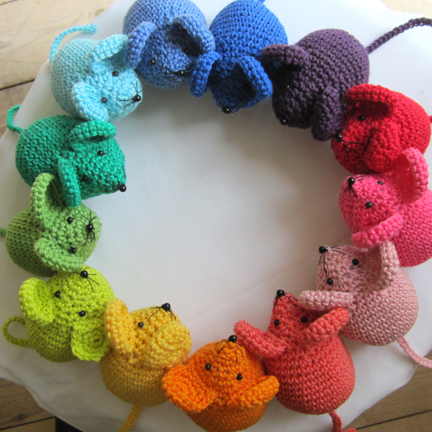
It was on Pinterest that I discovered Planet Penny , a fellow crafter who is as mad about rainbows as I am. I first discovered (and fell in love with) Penny's rainbow mice:
Aren't they just gorgeous?? Penny has now written a pattern for these so I shall have a go at making them myself.
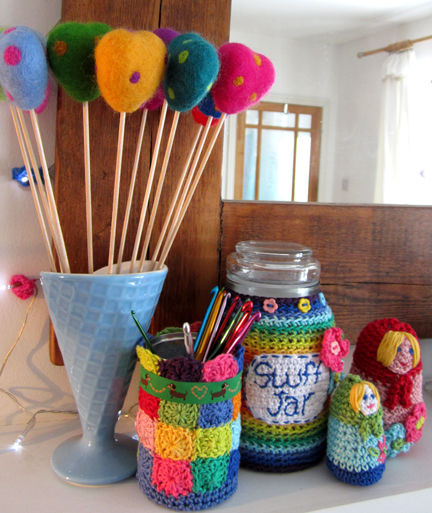
I also found a picture of some lovely storage jars that Penny has decorated - look:
I fell in love with the "stuff jar" and decided to do something similar to a container I use for putting in all the little bits of cotton and scraps that I always seem to accumulate (usually on my sleeves!) when I am sewing. It was plain plastic and a little boring. However it looks a bit more interesting now!
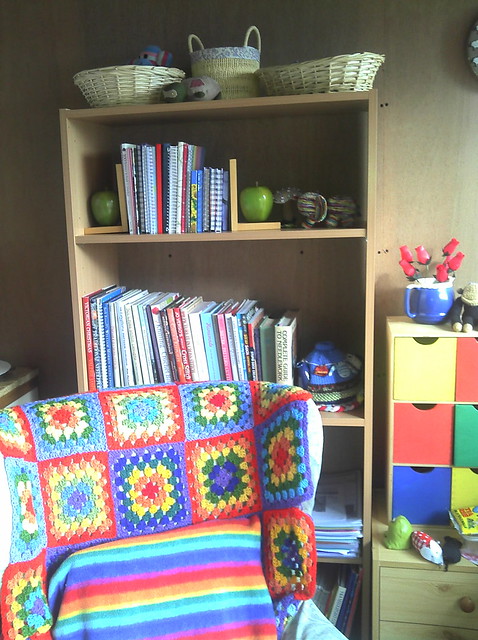
A little progress has been made on the shed. It is still in need of painting (I fear that might take a while!), but I did manage to put up some bookshelves earlier in the week. That means about half of my worktop is now clear, so I can utilise it a little better. The aim is not to just clutter it up with junk!
My current evening project is making some more granny squares for my rainbow granny that is covering my old Parker Knoll chair in my shed. This is my "sitting and knitting" chair which is ever so comfy but definitely benefits from a cheerier look! As you can see it doesn't quite cover the chair at the sides so I am in the process of adding a couple more rows down the side.
I've also been making some lovely spring goodies for sale ... watch out for a post later in the week!
Sunday, 18 March 2012
I love Pinterest!
Labels:
blanket,
bookshelves,
cover,
crochet,
granny square,
jar,
pinterest,
planet penny,
rainbow,
shed,
studio
Tuesday, 13 March 2012
Putting a little light on the subject
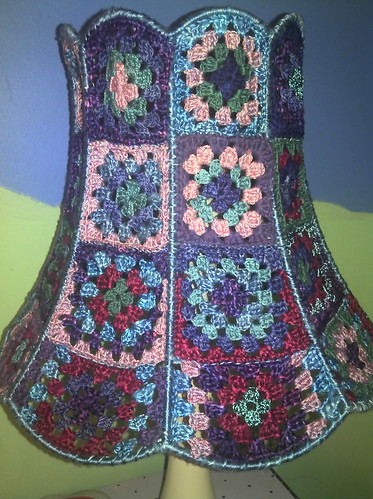
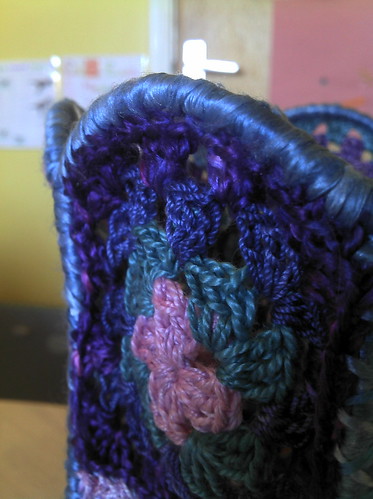
At last, it is finished! The first of my long-term projects which I showed in close-up earlier on this month. And here it is all done:
This is not its final resting place, as it will be going out in my shed/studio when that is decorated, but I put it on my bedside table just for now so you can admire it.
There's a lot of work gone into it. Firstly I wrapped the wire frame in pale blue silk. Then I crocheted squares in the right sizes to fill the gaps, attaching them as I went along. This was perhaps a little easier than you might think, as crochet is very stretchy so I didn't have to faff about with the pattern to make it fit the shape, just stretched it into place! For the second row down, I just used a slightly larger hook and slightly thicker yarn (I've used a mixture of silk and cotton, all hand-dyed by a lovely artist friend of mine).
The third row down was the trickiest as I had to increase the square towards the bottom - however after a bit of trial and error I found it easy enough to do.
However it really looks its best when you switch it on ...
Pretty, huh?
This is not its final resting place, as it will be going out in my shed/studio when that is decorated, but I put it on my bedside table just for now so you can admire it.
There's a lot of work gone into it. Firstly I wrapped the wire frame in pale blue silk. Then I crocheted squares in the right sizes to fill the gaps, attaching them as I went along. This was perhaps a little easier than you might think, as crochet is very stretchy so I didn't have to faff about with the pattern to make it fit the shape, just stretched it into place! For the second row down, I just used a slightly larger hook and slightly thicker yarn (I've used a mixture of silk and cotton, all hand-dyed by a lovely artist friend of mine).
The third row down was the trickiest as I had to increase the square towards the bottom - however after a bit of trial and error I found it easy enough to do.
However it really looks its best when you switch it on ...
Pretty, huh?
Thursday, 8 March 2012
A repair with bite!
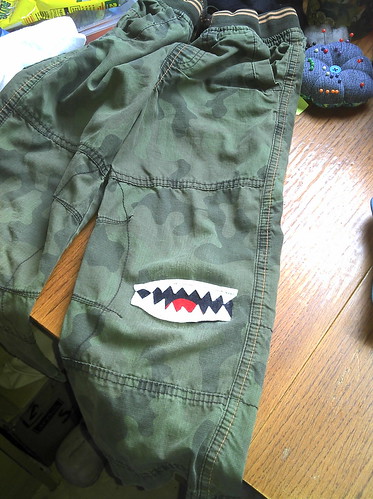
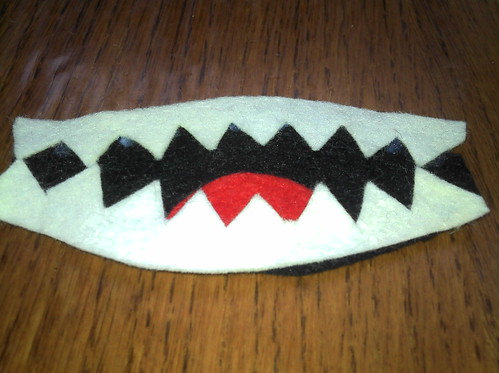
My youngest son Euan loves his combat trousers, but they had already taken a hammering by his big brother before they were passed on to him, so it wasn't long before the knee bit the dust. He really wanted to keep them though, so I promised to repair them for him. As a surprise, I turned a boring patch into a biting one!
First of all, I trimmed all the loose threads around the knee where the material had torn (actually I've just noticed that I hadn't actually done that when I took this picture! Let's just pretend I did then).
Next, I cut out the elements of the patch: a black oval shape for the mouth, two rows of sharp teeth, and a small semi-circle for the tongue.
I used felt for my shapes so that I didn't have any seams to deal with; hopefully it will stand up to a bit of wear and tear!
Next, I used dots of fabric glue to assemble all the parts of the patch before sewing it on to the trousers:
Then I attached the patch by machine using white thread. It's a bit of a faff doing it by machine, as I had to do each side separately, but I wanted to make sure it was really firmly attached. After machine sewing, I went round with a bit of black thread to make doubly sure the tongue and the sides of the mouth weren't going to work loose.
Result - one very happy boy!
In other exciting news - I finished my nearly-finished long-term project this afternoon! It's taken me over six months altogether and I am so delighted with it. I will post some pictures of it very soon.
Tuesday, 6 March 2012
Three large projects
I've got three long-term projects on the go at the moment.
This one is nearly finished ...
... so you only get a wee glimpse of it before I reveal the final result! Can you guess what it is?
This one is about halfway through ...
... and I will tell you about this one! It is going to be a patchwork skirt in rainbow colours. I'm sure I will look pretty mad in it but I don't care! I love rainbows so much, it will certainly cheer me up to wear it! I have been collecting fabric for over a year now, and cutting it into 10cm squares. Each row is half as long again as the row above, so there is a bit of gentle gathering going on. The final row will contain 168 squares! I am now sewing them all together in their rows on my serger to ensure there are no fraying ends, then the fun of gathering starts! A lot more to do yet before I can reveal the finished skirt.
And this project is yet to start ...
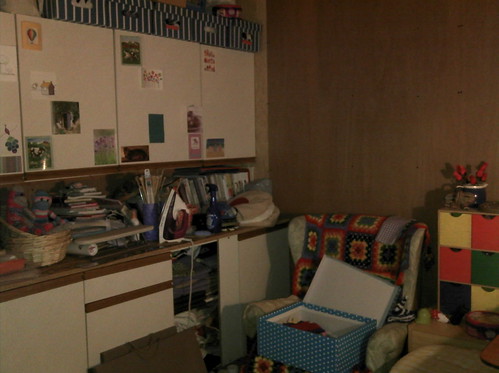
This is my lovely studio. It is warm, it is (fairly) dry ... but it is as yet undecorated (and rather messy in this picture!). My aim is to paint it inside, and add something to the walls (probably some shelving, definitely some artwork!). There is also, at the opposite end of the shed, a lot of boxes that need storing elswhere, and once I manage to get rid of those I can get on with the decorating. I am very lucky to have this space, and really want to make the most of it!
This one is nearly finished ...
... so you only get a wee glimpse of it before I reveal the final result! Can you guess what it is?
This one is about halfway through ...
... and I will tell you about this one! It is going to be a patchwork skirt in rainbow colours. I'm sure I will look pretty mad in it but I don't care! I love rainbows so much, it will certainly cheer me up to wear it! I have been collecting fabric for over a year now, and cutting it into 10cm squares. Each row is half as long again as the row above, so there is a bit of gentle gathering going on. The final row will contain 168 squares! I am now sewing them all together in their rows on my serger to ensure there are no fraying ends, then the fun of gathering starts! A lot more to do yet before I can reveal the finished skirt.
And this project is yet to start ...
This is my lovely studio. It is warm, it is (fairly) dry ... but it is as yet undecorated (and rather messy in this picture!). My aim is to paint it inside, and add something to the walls (probably some shelving, definitely some artwork!). There is also, at the opposite end of the shed, a lot of boxes that need storing elswhere, and once I manage to get rid of those I can get on with the decorating. I am very lucky to have this space, and really want to make the most of it!
Sunday, 4 March 2012
An alternative use for leftover sock yarn
I love knitting socks. Once you have made your first pair I swear you become hooked. They are a lot simpler to make than it appears at first, you can have so much fun with pattern and colour, and they are so nice to wear.
However, I find I always have lots of sock yarn left over - not enough to knit into another pair of socks, but enough to make me want to do something with it. Lots of sock knitters make sock yarn blankets with their leftovers, but whilst I find them lovely to look at, I like my blankets to be big and heavy, so a blanket didn't really appeal to me.
So, I decided to make a pair of leggings with my leftovers, and I am really pleased with the final results. I like to wear them under a long sweater, or with a skirt over the top, and they are great in our cold Scottish winter weather.
I loosely followed a pattern which I found on Ravelry, called Super Easy Leggings by Phoenix Bess. And she was right, they really were super easy! They didn't even take as long as I expected to make, about two months in all. I sewed the ends in as I went along to make it a less daunting prospect!
Thank you to my very kind friend Helen who bought me the pattern!
However, I find I always have lots of sock yarn left over - not enough to knit into another pair of socks, but enough to make me want to do something with it. Lots of sock knitters make sock yarn blankets with their leftovers, but whilst I find them lovely to look at, I like my blankets to be big and heavy, so a blanket didn't really appeal to me.
So, I decided to make a pair of leggings with my leftovers, and I am really pleased with the final results. I like to wear them under a long sweater, or with a skirt over the top, and they are great in our cold Scottish winter weather.
I loosely followed a pattern which I found on Ravelry, called Super Easy Leggings by Phoenix Bess. And she was right, they really were super easy! They didn't even take as long as I expected to make, about two months in all. I sewed the ends in as I went along to make it a less daunting prospect!
Thank you to my very kind friend Helen who bought me the pattern!
Friday, 2 March 2012
More adventures in drawing
As a member of a brilliant local arts group, I had the opportunity yesterday to be go to a drawing class, the first I had done in about 15 years. Despite being an inveterate doodler, I am no artist, but very keen to brush up my skills (excuse the very bad pun!). At the start of the class we were presented with a fabulous A3 pink pig art pad to keep (yay!), and given lots of tips and ideas on how to draw faces.
My major problem is this (and I wonder if other people find the same): if I have a tutor standing behind me (not literally, but in the room offering encouragement), the artistry flows and I produce some nice pieces. M'lud, the first exhibit:
This one took me about ten minutes, and I didn't try very hard, I was just trying to capture the essence of the shapes. Yet it's not bad.
Exhibit two:
This one I did even faster, as I was running out of time, and very keen to try out the technique of using bleach as a highlighter (it's a bit blobby but you can see how well it works along the nose). Again, not perfect (I didn't look back at the eyes so they don't match up very well in size!), but not bad. And each of these portraits I did in pen, so no rubbing out involved.
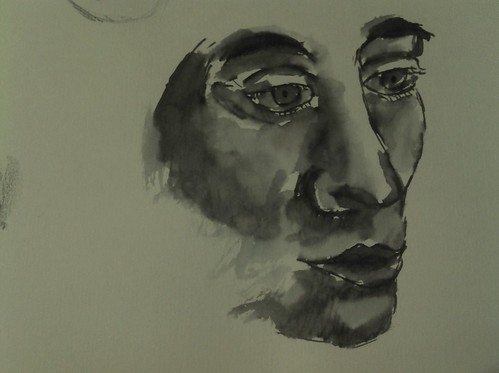
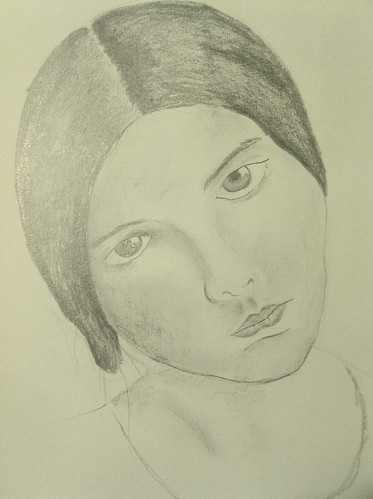
So - this afternoon I decided to have a go on my own. I pick a photograph as a reference, and spend about forty minutes producing a sketch. I hope you realise how selfless I am being in sharing this with you!
As you can see, the proportions are all wrong ... and somehow, there's no life in it. Although I enjoyed the process I am not at all happy with the end result, and despite lots of rubbing out and repositioning of just about everything, I still couldn't get it right. I haven't the confidence to draw without someone standing behind me saying "go on, you can do it!" - which would work out very expensive if I needed a cheerer every time I got the sketchbook out!
Never mind, we will get another session with the tutor soon and I will have another go at honing my skills. In the meantime, I shall carry on practicing (though I may not be brave enough to share the results!)
My major problem is this (and I wonder if other people find the same): if I have a tutor standing behind me (not literally, but in the room offering encouragement), the artistry flows and I produce some nice pieces. M'lud, the first exhibit:
This one took me about ten minutes, and I didn't try very hard, I was just trying to capture the essence of the shapes. Yet it's not bad.
Exhibit two:
This one I did even faster, as I was running out of time, and very keen to try out the technique of using bleach as a highlighter (it's a bit blobby but you can see how well it works along the nose). Again, not perfect (I didn't look back at the eyes so they don't match up very well in size!), but not bad. And each of these portraits I did in pen, so no rubbing out involved.
So - this afternoon I decided to have a go on my own. I pick a photograph as a reference, and spend about forty minutes producing a sketch. I hope you realise how selfless I am being in sharing this with you!
As you can see, the proportions are all wrong ... and somehow, there's no life in it. Although I enjoyed the process I am not at all happy with the end result, and despite lots of rubbing out and repositioning of just about everything, I still couldn't get it right. I haven't the confidence to draw without someone standing behind me saying "go on, you can do it!" - which would work out very expensive if I needed a cheerer every time I got the sketchbook out!
Never mind, we will get another session with the tutor soon and I will have another go at honing my skills. In the meantime, I shall carry on practicing (though I may not be brave enough to share the results!)
Saturday, 21 January 2012
Journalling - a new adventure
It's been a while since I blogged, but I have still been creative even though I've been quiet!
I'm generally more of a fabric fan, but just recently I had a yearning to doodle. I've fallen in love with pinterest recently and have been collecting pictures of art journals. I decided to start keeping one myself. I searched high and low in the local shops for a suitable book to use, but couldn't find anything! After waiting impatiently for a couple of weeks to see if any came in, I had the brainwave of making my own journal. I've always thought of this as a really hard, technical thing to do, but in fact it's really not that difficult.
So here is a sort-of tutorial (it's only a "sort-of" because I didn't take pictures of every stage, it just occurred to me afterwards that it might be good to share the process!).
OK so bear with me as I don't have pics of this bit. First thing I did was get hold of five A2 sized sheets of watercolour paper. Now I know not everyone has these lying around. I happen to have a very generous art-teacher friend who was clearing out her cupboards. Using a long ruler as a guide, I tore each sheet in half and half again, so I had four A4 sized sheets from each large one. I could have cut them, naturally, but I quite like the look of torn edges, plus I wanted a bit of a rough-and-ready look to my journal.
Once each sheet was torn into four, I folded the four sheets in half, so I ended up with five stacks of folded paper. Then, using a bradle (is that how you spell it? little metal spike with nice handle!) I poked three holes through the centre of each set of pages at regular intervals (having measured them first).
Picture coming soon, I promise! I then stitched the pages together. I kind of used this very helpful tutorial to work out how to stitch the pages together, but having only made three holes rather than four I realised I had made life a little difficult for myself! Still, I managed to attach all the pages to each other. You would think it is very fiddly, but honestly it's not. This pic show the sewn pages of my journal (I used waxed linen thread to sew it together, and it's black because that's all I had!)
See? It's not mega pretty along the edge but it won't show in the finished article, and it's fairly unobtrusive inside.
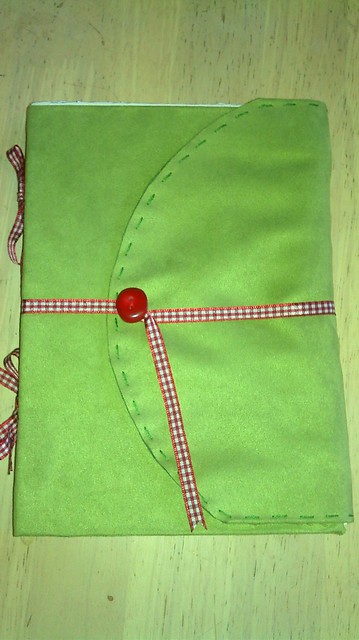
OK, next I made my cover. I used a lovely green moleskin-effect fabric that I had bought years ago, waiting for the right project to "speak" to me, and it shouted that it wanted to be a journal cover! I don't know how well it will stand up to wear and tear, and I suspect it will look fairly grubby by the time the journal is full, but I think that will all add to the authenticity.
So I started by cutting two pieces of stiff card the same size as my folded pages (so about A5). I measured the height of my sewn pages and made that the distance between my pieces of card. I glued the card down with some wood glue (just what I had to hand; copydex or fabric glue would do just as well). I then weighted down the card until it had dried as the glue had made it warp a little.
I then cut out my fabric, leaving about 2cm extra round the sides, and about 10cm at the right hand side. This was to make a flap to go round the journal, to keep it protected when not in use. I also cut two parallel slots in the "spine" of the fabric (you can see those in the photo above) at two points, for me to thread the ribbon through later. I then glued the extra fabric down onto the stiff card, trimming it at the corners and the spine so it folded down nicely.
Having made a flap for the front, I decided it would work better if the flap was rounded. So I used a dinner plate to draw a curve onto the fabric, and onto a second piece of fabric which I then attached with a simple running stitch to the over. Here it is:
The added bonus is that the flap makes a little pocket which is perfect for keeping wee pictures and inspirations in for later!
Now I added the ribbons which attach the book pages to the cover. I've not seen this done before so I made this bit up as I went along. Here's a close-up of the ribbon attached:
Basically I threaded the ribbon onto a tapestry needle and, starting from the outside, threaded it through the uppermost slot, then down through the threads on the pages, then out through the lower slot. I tied the ribbon in a bow and cut it to the correct length, then repeated for the other end. I won't lie: this bit IS fiddly. If you have a curved needle then it will make it much easier. But don't let that put you off; it's only a very small part of the process. Here's how it looked after both ribbons are attached:
I rather like it!
Next step was to finish off the cover. I took another length of the red gingham ribbon and sewed it, together with a lovely cherry-coloured button, onto the centre of the curved flap. The ribbon wraps around the book, then twists round the button to hold it firmly in place. In all I bought two metres of ribbon and that was plenty for the whole project. I am SO glad I went for red, it really pops against the green fabric!
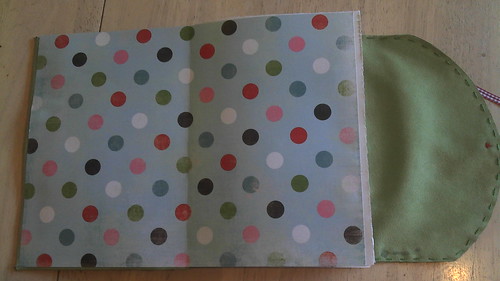
Final step was to add some endpapers. These cover up the bits where the fabric is glued inside and hide the spine. They also help to strengthen the bond between the pages and the cover. I used a couple of sheets of scrapbooking paper, cut them to A4 size then folded them in half, then glued them in place, making sure the pages were squared up to the stiff card of the cover:
I then placed the whole thing under a pile of books until the glue had dried.
So there you go - I hope you like my journal! It was my first attempt at making a journal and I can see all the bits that didn't quite work the way they should have ... but I'm happy with the basic principles (which is why I'm brave enough to share them!)
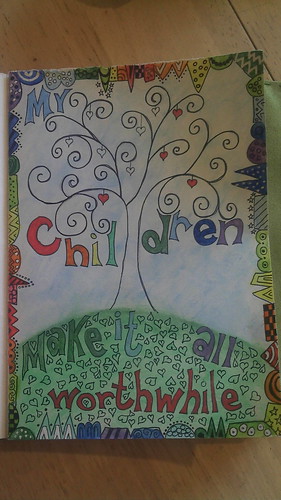
Lastly of course I created my first journal page ... this is it almost completed. Since I took this picture I've added some more colour to the "leaves" and the trunk.
Thank you for reading; I hope this inspires you to have a go at making your own journal!
Subscribe to:
Posts (Atom)